Welcome to the best specialized store for optimal reverse osmosis systems. Here you will find the best water filtration systems so that you can weigh your purchase and make the best selection in terms of quality, price, durability, best brand, best filtration, best flow.
Let’s see a comparison between some market proposals so that you can choose the one that best suits your needs:


What is the best brand of Optima Reverse Osmosis?

- The most modern and environmentally friendly method of water treatment
- NO chemicals are required
- With pump, frame, pressure indicator and dust-proof housing
- All foreign substances are filtered out up to 99%
- Easy to assemble and use

- Finerfilters, home reverse osmosis system, 5 stages (50GPD), for the best drinking water
- This excellent system produces up to 190 liters per day of purified water and comes with a 3 US gallon storage tank, installation manual, chrome faucet, and all necessary pipes, pre-filters, post filters and accessories for easy installation.
- The membrane can last between 1 and 2 years depending on the hardness of the water.
- Filters to be replaced every six months, a FinerfilterLtd brand product.
- System dimensions: 41 x 26 x 44 cm. Tank: 26 x 34 cm.

- Domestic equipment Reverse Osmosis 5 Stages with pump, UNBEATABLE QUALITY, FIRST MATERIALS
- GUARANTEE: 2 years

- Activated carbon 100% coconut shell
- Includes New Look tap
- NANOSILVER antibacterial post-filter
- FILMTEC 50 GPD membrane NSF / ANSI Standard 058 certified
- Working pressure: 2.5 to 4.2 Bar, Inlet temperature: 5 to 35 ºC, Maximum inlet TDS: 1,000 ppm


Where to get Optima Reverse Osmosis spare parts?
Next, let’s see the spare parts or spare parts of the optimal reverse osmosis system:

- Universal compatible standard 10-inch reverse osmosis filter replacement cartridges, standard size 10 “x 2.5”.
- Removes up to 99% of contaminants, including lead, fluoride, chlorine, arsenic, bacteria, viruses, heavy metals, etc.
- 6-pack includes 1 PP sediment, 2 front carbon filters, 1 75 GPD reverse osmosis membrane, 1 post carbon filter and 1 alkaline mineral filters.
- All filters are individually wrapped and sealed to preserve freshness and extend shelf life.
- Independent Third Party Tested to NSF / ANSI Standard, High Capacity Replacement Cartridges.


- Reverse Osmosis Filter Quick Fit Check Valve
- Non-return valve straight connector for any air connection to stop the return of compressed water, etc.
- Included
- Quick Adjust Pressure Check Valve for 1/4 “Tube
- Part of the standard RO system and can be used to replace any non-working pure water line check valve.

- 100% leak free, 100% reusable
- Tube ID 1/4 inch, 3/8 inch
- Quickly and easily connect and disconnect without any other tools.
- Applications include pressurized storage tanks for reverse osmosis (RO) systems
- Made of premium plastic, high quality, durable

- Made of high quality stainless steel for durability.
- The elegant color and elegant design make it a great decoration for your kitchen.
- Gooseneck faucet with 360 ° rotation design.
- Fits all undercounter water filter systems.
- Widely used in various kinds of pure water, water filters, water purifiers, water softeners, water electrolysis machines.

Why buy an Optima Reverse Osmosis equipment?
Our Optima reverse osmosis equipment has the highest quality standards so that you can filter your water optimally and safely against all types of impurities and heavy metals, as well as all types of bacteria.
What is reverse osmosis and what is it for?
The reverse osmosis is literally a water filtration system that operates by using pressure. With the force of this pressure, the water is led through a semi-permeable membrane, from a less concentrated solution to a more saline solution to balance the concentrations.
It is, therefore, the separation of
dissolved salts in water such as chlorides, sulfates, carbonates, etc.
What does Optima reverse osmosis remove?
Reverse osmosis examples
Optima Reverse Osmosis Filters Price
Prices usually vary between size, utility, type of stages, quality, use. You can identify the different prices that we have available in our online store.
Our iversa osmosis filters deserve the best opinions of professionals in the field due to their manufacture and durability.
The osmosis team is equipped with the best quality standards, as we have mentioned before to give you the best result.
Membranes
Our membranes are made of the best quality membranes to provide you with an efficient and effective service against impurities and thus take care of your health.
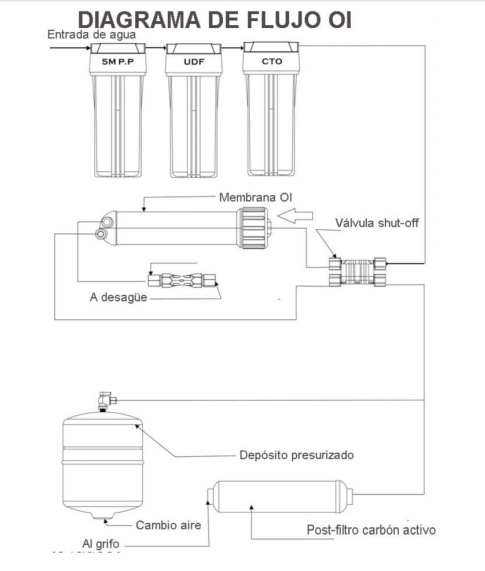
Reverse Osmosis Scheme
Where to buy the Optima Reverse Osmosis filter system?
You can buy the filters both from our portal and from the amazon site.
Optima Reverse Osmosis System Maintenance
Maintenance is simple, just replace the membranes and you’re done. If you require another type of repair,
you should consult a specialist.
How to assemble an Optima reverse osmosis equipment?
To assemble the reverse osmosis system, follow the instructions below:
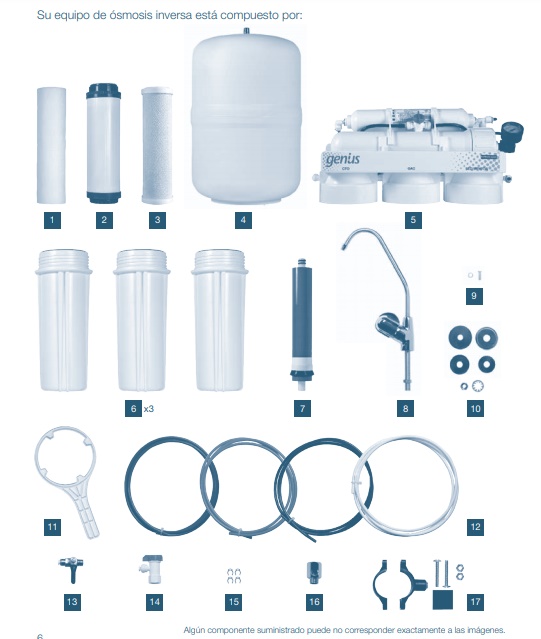
When unpacking the equipment, verify that it does not present any damage caused in transit and
that it is complete with all the indicated components.
1 Sediment pre-filter.
• Eliminates suspended solids.
• Made of extruded polypropylene (melt-blown).
• 5 µm filtration.
• Measure 10 ”.
2 GAC granular activated carbon pre-filter.
• Protects the membrane and prevents its deterioration due to the action of chlorine.
• High efficiency coconut shell activated carbon charge.
• Measure 10 ”.
3 Mixed pre-filter of extruded active carbon and CTO polypropylene filter mesh.
• Its construction avoids preferential passages and the leakage of fines in the
treated water , achieving a greater adsorption capacity.
• Active carbon extruded in block.
• 5 µm filtration.
• Measure 10 ”.
4 Accumulator tank.
• 12 liters and a useful volume of 5-6 liters of treated water.
Air preload pressure 0.5 Kg / cm2.
5 Upper assembly.
• Composed of various accessories: membrane container, manometer to control the
operating pressure, flow regulator, flushing valve for periodic
and manual cleaning of the membrane, automatic shut-off valve (to avoid continuous drainage
of reject water once the accumulator tank is full) and active carbon post-filter in line
for final treatment of the water before consumption with
high-efficiency coconut shell activated carbon charge . (Pump and electrical components in models with pump).
8
6 Cartridge holder cup.
• Container for sediment filter cartridges, GAC and CTO.
7 Reverse osmosis membrane.
• TFC-HIGH REJECTION (70 gpd) for the separation of salts in the treated water.
8 9 10 Dispensing tap and accessories.
• For installation in the kitchen sink and thus have a supply of
treated water at your fingertips. The spout of the dispenser tap rotates 360 ° and can be placed
in the most suitable position in each case.
11 Manipulation key.
• To open and close the cartridge holders at the time of replacement.
12 Connecting pipes.
Tubes made of linear low-density polyethylene.
• Blue tube: treated water.
• Red tube: Reverse osmosis feeding.
• White tube: Interconnection with the accumulation tank.
• Black tube: Drain.
13 16 Feed valve and adapter nipple.
• To adapt the installation to the inlet of the reverse osmosis equipment.
15 Safety clips.
• Safety elements for fastening the tubes with the connection accessories.
17 Drain collar.
• For connecting the drain pipe of the reverse osmosis equipment to the sink siphon. Welcome to the best specialized store for optimal reverse osmosis systems. Here you will find the best water filtration systems so that you can weigh your purchase and make the best selection in terms of quality, price, durability, best brand, best filtration, best flow. Source
THE INSTALLATION OF THE OSMOSIS INVESA OPTIMA SYSTEM IS AS FOLLOWS:
For installation in the kitchen sink and thus have a supply of
treated water at your fingertips. The spout of the dispenser tap rotates 360 ° and can be placed
in the most suitable position in each case.
Manipulation key.
• To open and close the cartridge holders at the time of replacement.
12 Connecting pipes.
Tubes made of linear low-density polyethylene.
• Blue tube: treated water.
• Red tube: Reverse osmosis feeding.
• White tube: Interconnection with the accumulation tank.
• Black tube: Drain.
The feed water must meet the specifications indicated in the
Failure to comply with these indications may limit the life of the membrane
and affect the quality of the water produced. In most cases it may be necessary to
install a 20-50 micron impurity filter and a water softener. For waters
not controlled by water managers or of doubtful origin, it is recommended to carry out a complete
physical-chemical and microbiological analysis of the water to determine if it requires
any specific pretreatment.
DO NOT CONNECT THE EQUIPMENT TO A SUPPLY OF MICROBIOLOGICALLY
CONTAMINATED WATER , OR OF UNKNOWN QUALITY, WITHOUT PRIOR ADEQUATE DISINFECTION.
Before starting the installation:
Choose the appropriate place for the location of the equipment with easy access, on a flat surface
and protected from direct sunlight, rain, humidity, temperatures below
5 ° C and above 35 ° C and that allows easy maintenance. The equipment is specially designed to be installed under the kitchen sink.
The water supply must ensure a minimum pressure of 2.5 kg / cm2
and a maximum of 5.5
kg / cm2
. For higher pressures, the installation of a pressure reducing valve is essential. For pressures less than 2.5 kg / cm2
, correct the defect with a
pressure group for the entire installation or install a unit with a pump (GENIUS-4/75 / PUMP).
NEVER INSTALL THE EQUIPMENT IN THE HOT WATER LINE. The
temperature limits for feeding the equipment are from 5º to 35º C.
4.1 Connecting the feeding water
Close the general water inlet tap or the section where the equipment is to be installed.
Install the accessories supplied to supply the equipment (nipple and supply valve), always in a cold water line.
Connect the RED supply tube from the supply valve to the SEDIMENT filter inlet fitting.
Water intake placement
Close the tap on the cold water hose that
feeds your kitchen tap. If not, close the general
water tap in your home.
Unscrew the cold water hose.
Install the 3/8 ”wrench included in the installation kit, placing the
gaskets (Although Teflon is better)
Then reconnect the hose to the 3/8” socket
recently installed. Connect one end of the tube to the
tap fitting and the other end to the water inlet of our equipment (8)
(IN).
Dispensing tap placement:
Drill a 12mm hole in the
sink, making sure the bottom is accessible for
connection.
Insert the tap thread together with the chrome trim ring and the
sealing gasket through the upper part of the worktop or
steel sink .
At the bottom of the thread connect the remaining parts in the
following order: lock washer, washer and nut. Tighten the
nut firmly, to ensure the correct fixation of the tap on your
countertop.
Insert one end of the pipe into the chrome
female thread connection , place the white plastic oval at the end of the pipe
and insert the white straight piece into the pipe. Once we
have it, screw it onto the lower thread of the tap, ensuring
tightness. Then connect the other end to
the post filter outlet elbow (FAUCET).
Drain connection: It is recommended to install the collar after
the sink siphon to avoid noises from the rejection of water,
although it can also be installed before.
Drill a 6mm hole, fit the collar by tightening the nuts.
Connect a tube for the drain and the other end to the restrictor
(DRAIN).
Storage tank connection: Do not handle the air in the
tank. Take the plastic valve (
blue handle ) from the installation kit and screw it onto the accumulation tank.
To ensure tightness, use roll (not thread) Teflon
for the tank thread and tighten by hand without overdoing it.
Subsequently, connect another pipe that connects the tank with the other
end of the post filter (TANK).
Commissioning of the equipment
• Check that all connections are secure and
tight.
• Disconnect the tubing that goes from the third filter outlet to the
4-way valve, taking it to a bucket or drain.
• Slowly open the tap of the water inlet and you can see how
black water begins to come out of the pipe that we have just
disconnected. Once the black (
activated carbon powder ) stops coming out (it may not come out), close the inlet
port and reconnect the tube to the four-way valve.
• Open the inlet valve again and let the equipment work for 4 hours. After
4 hours, empty the tank completely (
black, cloudy or whitish water may come out , this is normal).
• Repeat this operation 2-4 times until the water
runs clear (this process will be repeated at each filter change).
• From now on you will be able to consume your osmotic water.
• The tank that comes in the equipment is already loaded with air
(0.5kg), in no case do you have to modify it without the
consent of the manufacturer
Other categories:
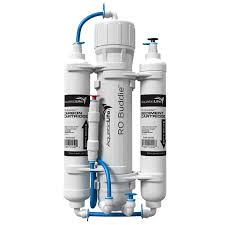
REVERSE OSMOSIS 3 STAGES
PORTABLE REVERSE OSMOSIS
REVERSE OSMOSIS MYRO 7
Última actualización el 2024-02-07 / Enlaces de afiliados / Imágenes de la API para Afiliados